Articulate 360 Deployment Guide
 Last Updated: March 31, 2026
Table of Contents
Change Log
March 31, 2026
March 18, 2025
February 18, 2025
May 28, 2024
September 19, 2023
April 4, 2023
March 1, 2022
February 15, 2022
September 21, 2021
February 23, 2021
January 22, 2021
January 13, 2021
May 19, 2020
April 7, 2020
General Description
Supported Platforms
Installation Dependencies
Functional Dependencies
Parameters
Settings
Update Settings
Scenario 1: Users Can See and Install Updates
Scenario 2: Users Can See Updates but Non-Admin Users Can't Install Them
Scenario 3: Users Can’t See or Install Updates
Machine Settings
Privacy
User Settings
Language
Notifications
Preparing Articulate 360 for Deployment
Overview
Process Steps
Creating Articulate 360 Apps in MECM
Overview
Prerequisites
Process Steps
Creating App Requirements for Articulate 360
Overview
Prerequisites
Process Steps
Creating Thumbnail Handler Apps
Overview
Prerequisites
Process Steps
Preparing Articulate 360 Apps for Deployment
Overview
Prerequisites
Process Steps
Deploying Articulate 360 Apps
Overview
Prerequisites
Process Steps
End User Experience
Overview
Prerequisites
Process Steps
Troubleshooting
Overview
Software Center
Change Log
March 31, 2026
- Storyline 360 now uses Microsoft .NET 10 or later to improve performance across the app.
March 18, 2025
February 18, 2025
May 28, 2024
- 64-bit Storyline 360 is now the default Storyline version in the desktop app. That means you get enhanced stability, performance, and memory access with no extra steps.
September 19, 2023
- Articulate 360 desktop apps no longer support the Chinese language interface. However, you can still publish courses to any language, including Chinese.
April 4, 2023
- We added a functional dependency for course creators who need to publish directly from Storyline 360 to Reach 360, our distribution tool that integrates with Articulate 360 to deliver training to more learners.
March 1, 2022
- Microsoft rebranded System Center Configuration Manager (SCCM) to Microsoft Endpoint Configuration Manager (MECM), so we updated references throughout this guide to use the latest product name.
February 15, 2022
- We updated our functional dependencies to clarify support for the latest versions of Microsoft PowerPoint and Microsoft Word.
- The INSTALLFOLDER parameter now applies to all packages, including Articulate.360.Package.msi. We deprecated the DESKTOPSERVICE_INSTALLFOLDER and DESKTOPAPP_INSTALLFOLDER parameters.
September 21, 2021
- We updated our supported platforms to end support for Windows 8.1 and add support for Windows 11.
- We updated our installation dependencies to require Microsoft .NET Framework 4.8 (rather than 4.5.2).
- We updated the examples to remove Windows 8.1 references.
February 23, 2021
- Automatic updates for the Articulate 360 desktop app are now enabled for everyone by default, as described in the update settings. Previously, automatic updates were enabled by default only for new installations. If you've disabled automatic updates via the registry, this change won't affect your users, and automatic updates will remain disabled.
January 22, 2021
- We clarified that the default permissions allow end users to install authoring apps (e.g., Storyline 360) without needing admin privileges.
January 13, 2021
- We added page numbers for easier navigation and reference.
- We updated our supported platforms to end support for Windows 7.
- We updated our functional dependencies to end support for Microsoft Office 2010-2013.
- We updated the examples to remove Windows 7 references.
May 19, 2020
- We added a new registry key to the update settings to DisableAutomaticUpdates.
April 7, 2020
- We reorganized the settings and added a new registry key to DisableNonAdminInstalls.
- We reformatted the guide and enlarged the text so it’s easier to read.
General Description
This document describes how to prepare, add, and deploy Articulate 360 using the application library in Microsoft Endpoint Configuration Manager (MECM).
Supported Platforms
Articulate 360 is supported on 64-bit mainstream versions of the following operating systems:
- Microsoft Windows 11
- Microsoft Windows 10
Installation Dependencies
These dependencies are installed by our installation bundles (.exe) and should be installed manually if our installation packages (.msi) are installed.
Functional Dependencies
- To allow your content creators to publish Storyline 360 courses to Reach 360, you must deploy Storyline 360 build 3.74.30180.0 or later. Reach 360 is an easy-to-use distribution tool that integrates with Articulate 360 to complement your learning management system (LMS) and deliver training to more learners, including deskless workers, contractors, and customers.
- Microsoft Office 365 (desktop apps only) or the latest perpetual version of Microsoft PowerPoint (32-bit or 64-bit)
Parameters
Each package accepts an optional INSTALLFOLDER parameter to specify a non-default install location.
Settings
There are several settings for customizing your Articulate 360 installation, including update, machine, and user settings. All registry keys in this section are String Value (REG_SZ) type.
Update Settings
One of the benefits of an Articulate 360 subscription is that users receive regular updates with new features and bug fixes. We understand that users aren't always allowed to install software, so we provided a way to lock down your environment.
There are three true/false registry keys that control updates:
Key | Description |
DisableUpdates | By default, users get notified when Articulate 360 updates are available. This key allows you to disable updates on each machine. When updates are disabled, users won’t see that updates are available, so they won’t be able to install updates. If you disable updates, you’ll need to distribute updates via SCCM. We generally release updates once a month. |
DisableNonAdminInstalls | By default, users can update the Articulate 360 desktop app plus install and update Storyline 360, Studio 360, Replay 360, and Peek 360 without needing admin privileges. This key allows you to disable non-admin updates. |
DisableAutomaticUpdates | By default, updates for the Articulate 360 desktop app install automatically, and users can turn automatic updates on/off in their preferences. This key allows you to disable automatic updates and hide the on/off option from users’ preferences. |
Prerequisite Set the update registry keys before installing software on users’ computers. |
Here are the values you should set for each key above, depending on the scenario you want to accomplish.
Scenario 1: Users Can See and Install Updates
This is the default scenario. Monthly updates for the Articulate 360 desktop app install automatically behind the scenes (unless users turn off automatic updates in their preferences). Users can install the authoring apps (e.g., Storyline 360) without needing admin privileges. Users will see updates for the authoring apps when they’re available, and users can install those updates without needing admin privileges.
HKLM\Software\Articulate\Common\Settings\DisableUpdates = false
HKLM\Software\Articulate\Common\Settings\DisableNonAdminInstalls = false
HKLM\Software\Articulate\Common\Settings\DisableAutomaticUpdates = false
Note: In this scenario, you can set DisableAutomaticUpdates to true with the same result that users can see and install updates. However, users won’t have the option to install updates for the Articulate 360 desktop app automatically. In that case, users would need to click the Update button in their desktop app to install updates.
Scenario 2: Users Can See Updates but Non-Admin Users Can't Install Them
In this scenario, users see updates when they’re available in the Articulate 360 desktop app, but non-admin users can’t install updates.
HKLM\Software\Articulate\Common\Settings\DisableUpdates = false
HKLM\Software\Articulate\Common\Settings\DisableNonAdminInstalls = true
HKLM\Software\Articulate\Common\Settings\DisableAutomaticUpdates = true
Note: In this scenario, you can set DisableAutomaticUpdates to false with the same result that non-admin users won’t be able to install updates. Users will see the option to turn automatic updates on/off in their preferences, but it won’t work for non-admin users. However, users who have admin privileges on their computers will receive monthly updates for the Articulate 360 desktop app automatically (unless they turn off automatic updates in their preferences).
Scenario 3: Users Can’t See or Install Updates
This is the most restrictive scenario. Users won’t see updates when they’re available in the Articulate 360 desktop app, nor will they be able to install updates.
HKLM\Software\Articulate\Common\Settings\DisableUpdates = true
HKLM\Software\Articulate\Common\Settings\DisableNonAdminInstalls = true
HKLM\Software\Articulate\Common\Settings\DisableAutomaticUpdates = true
Note: When DisableUpdates is true, it overrides the other settings, so the other settings can be either true or false with the same result. Users won’t see updates when they’re available, so they won’t be able to install updates either. Nor will they see the option to install updates automatically in their preferences.
Machine Settings
In addition to the update settings described above, there’s one other setting you can manage at the machine level.
Privacy
You can help improve Articulate 360 desktop products by sending usage data to our servers. We analyze feature metrics and error reports from Articulate 360 desktop products as well as anonymized device and browser data when learners view published output. If you'd prefer to opt out of these analytics, set the following registry key to true.
HKLM\Software\Articulate\Common\Settings\PrivacyOptOut = true
User Settings
Users can set their own preferences for language and notifications in the Articulate 360 desktop app. You can also control them with the following registry keys. Note that [HKEY_CURRENT_USER] takes precedence over [HKEY_LOCAL_MACHINE].
Language
Articulate 360 desktop apps are available in several languages. Set the following registry key to en-US (English), fr-FR (French), de-DE (German), or es (Spanish).
HKCU\Software\Articulate\Common\Settings\CurrentUICulture
Notifications
Desktop notifications are enabled by default upon installation of the Articulate 360 package. Users will get instant desktop notifications from the system tray for Articulate 360 events, such as when new updates are available. If you’d prefer users not see these notifications, set the following registry key to false.
HKCU\Software\Articulate\Common\Settings\IsNotificationEnabled = false
Preparing Articulate 360 for Deployment
Overview
This procedure describes how to prepare Articulate 360 for unattended installation. The aim of this procedure is to create and prepare the installation source folder for use with Microsoft Endpoint Configuration Manager.
Process Steps
- Go to https://id.articulate.com/redirect/downloads/all to download the files for each Articulate 360 app.
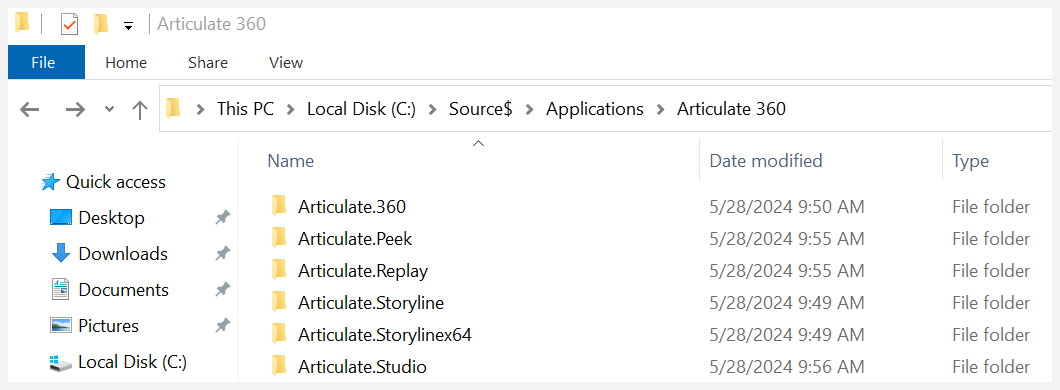
- Place the downloaded files into a folder, then give the folder a name.
- Copy all content from the Articulate 360 folder to a source share like this: \\CM01\Source$\Applications\Articulate 360\.
- The Articulate install package contains 13 MSI install packages that can be installed in various combinations. If you want to install each MSI file as a separate application, creating a subfolder for each MSI is highly recommended. Otherwise, each MSI will be downloaded multiple times during deployment.
Creating Articulate 360 Apps in MECM
Overview
This chapter describes how to create new applications for Articulate 360 using Microsoft Endpoint Configuration Manager. In this example, we'll use the Application Model to create an app for each MSI installer.
Another option is to create a script to install multiple MSIs as a single app. If you want to use this option, we recommend using the free community tool PowerShell App Deployment Toolkit, which has a lot of great built-in features to support enterprise deployment.
Prerequisites
In order for the operator to perform the steps described below, the following requirements must be in place:
- The operator must have access to a system running the Configuration Manager administration console.
- The operator must be logged in with a user account with permissions to create and deploy applications.
Process Steps
This process describes how to create a new application in Microsoft Endpoint Configuration Manager.
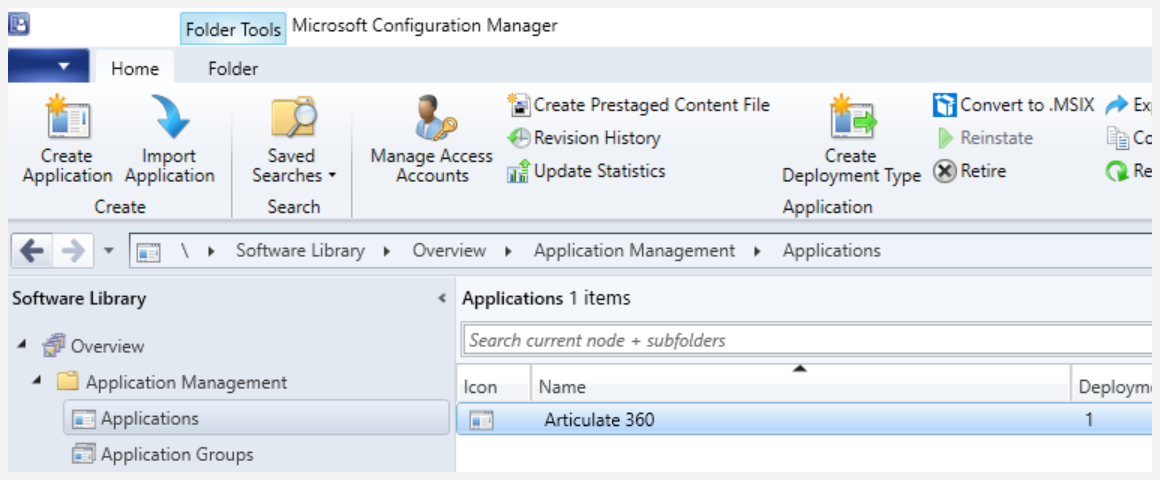
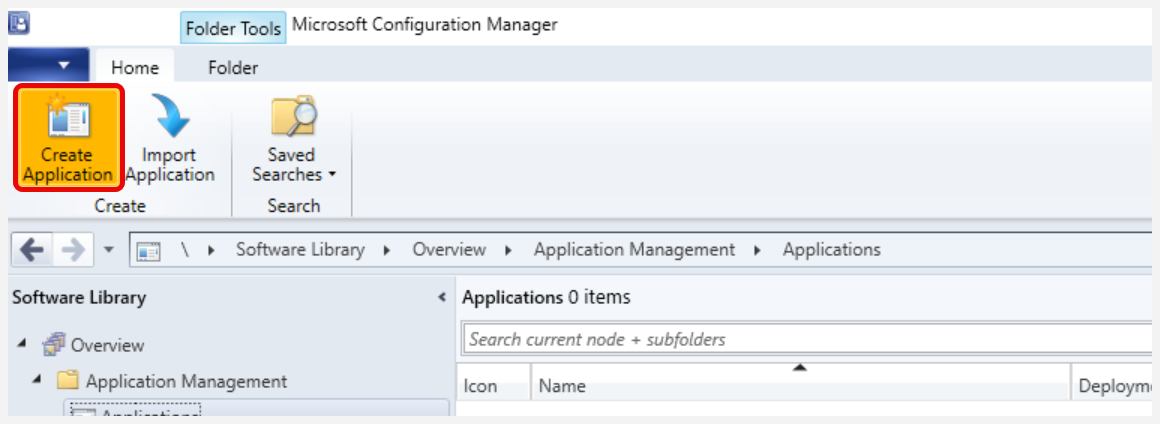
- In the Configuration Manager console, navigate to Software Library / Overview / Application Management / Applications.
- In the ribbon menu, click Create Application.
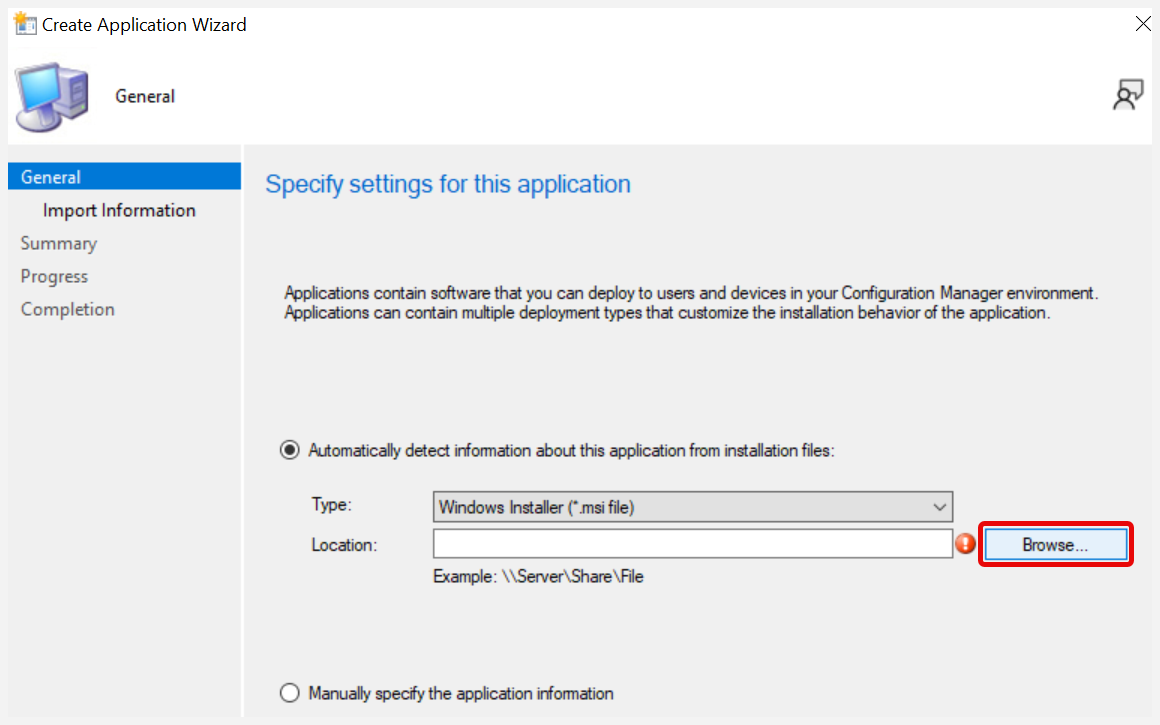
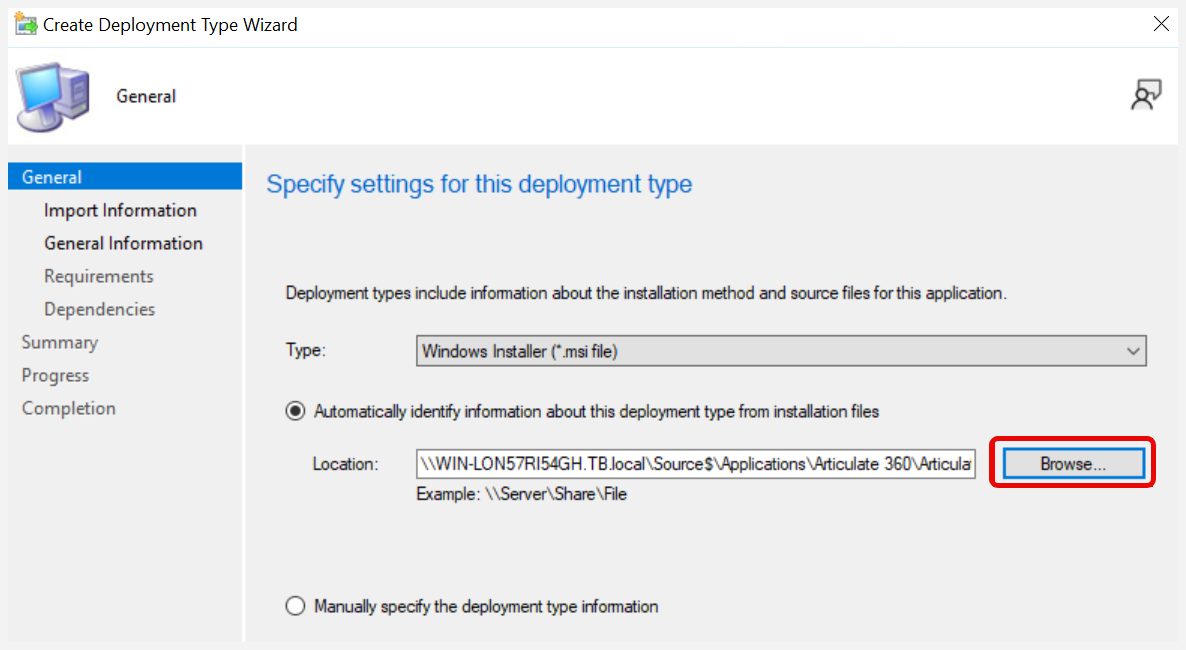
- In the Create Application Wizard, verify that Automatically detect information is selected and that the type is Windows Installer (*.msi file). Click Browse…

- Navigate to the source folder (by using the UNC share path) \\CM01\Source$\Applications\Articulate\Articulate.360\, select the Articulate.360.Package.msi file, and click Open.
- On the General page of the Create Application Wizard, click Next.
- Verify that the imported information is correct and that the import was successful. Click Next.
- On the General Information page, verify that the name is displayed as you would prefer to see it in the Configuration Manager console. Fill in the Publisher (Articulate) and any other relevant information.
Note the Installation program default value (msiexec /i "Articulate.360.Package.msi" /q). If you want to install this application as part of a script, use this command. - Verify that Install behavior is set to Install for system, and click Next.
- On the Summary page, click Next.
- On the Completion page, verify that the application was created successfully, and click Close.
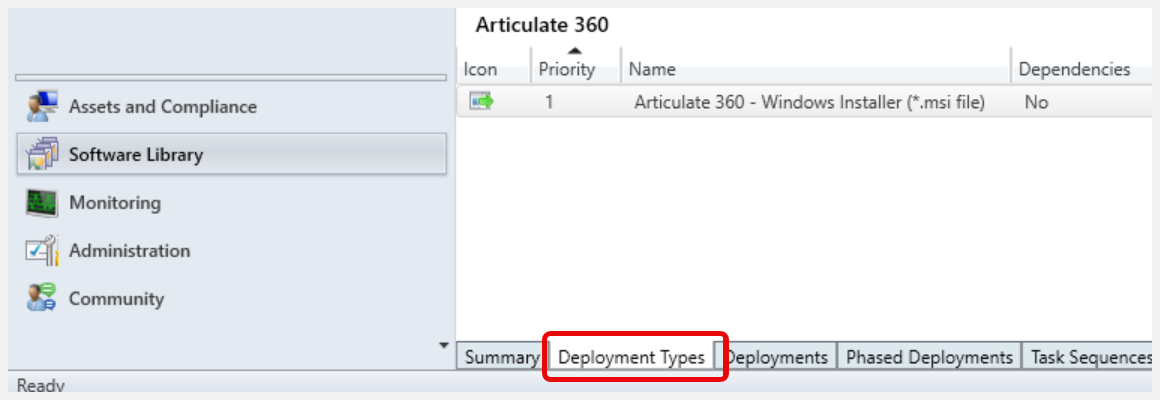
- In the Configuration Manager console, select the newly created Articulate 360 app.
- Select the Deployment Types tab.
- Right-click the deployment type Articulate 360 - Windows Installer (*.msi file), and select Properties.
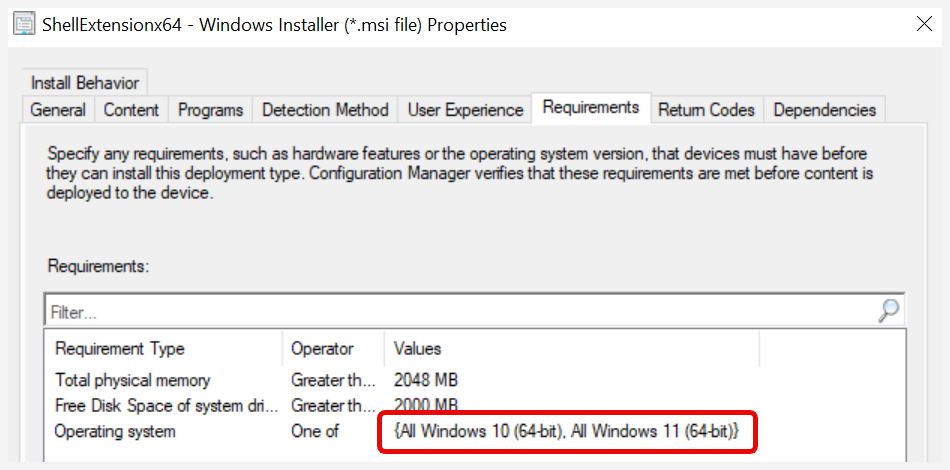
- Select the Requirements tab, and click Add…
Note: You can create many different requirement rules, but in the following steps, we provide three common examples that can be used to target the right deployment type for the right system/environment.
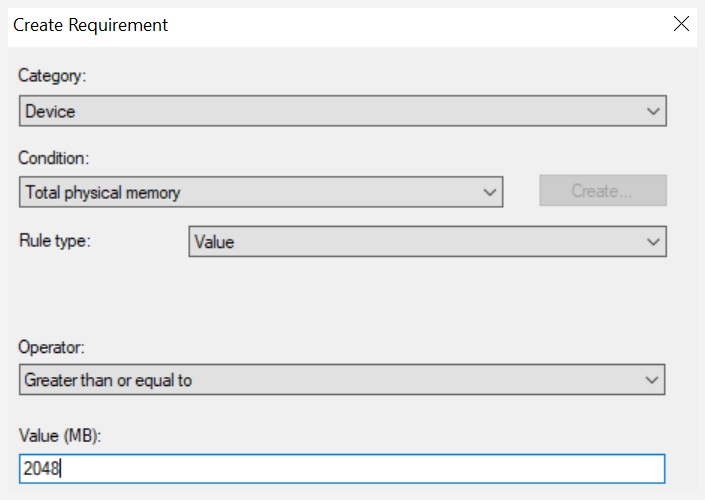
Requirement rules can be used to control which systems the application can be installed on. There may be requirements to prevent the application from being installed on servers. - Create a requirement rule with the following settings, and click OK:
- Category = Device
- Condition = Total physical memory
- Rule type = Value
- Operator = Greater than or equal to
- Value (MB) = 2048

- Click Add…
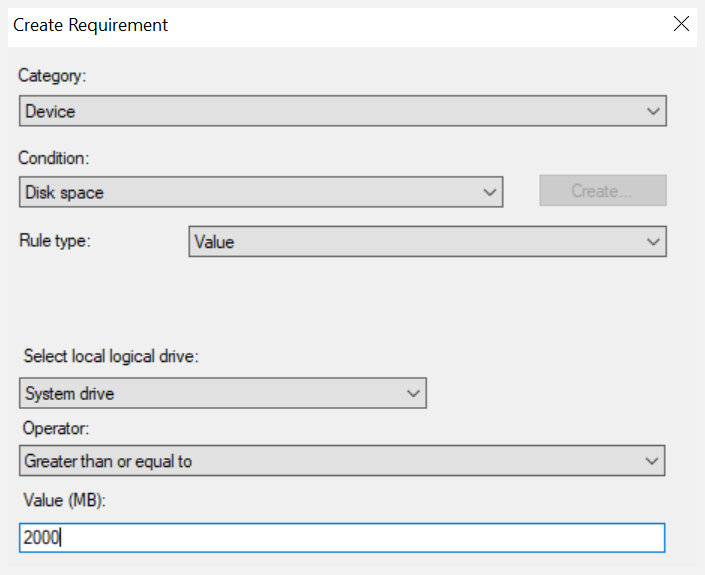
- Create a requirement rule with the following settings, and click OK:
- Category = Device
- Condition = Disk space
- Rule type = Value
- Select local logical drive = System drive
- Operator = Greater than or equal to
- Value (MB) = 2000
- Click Add…
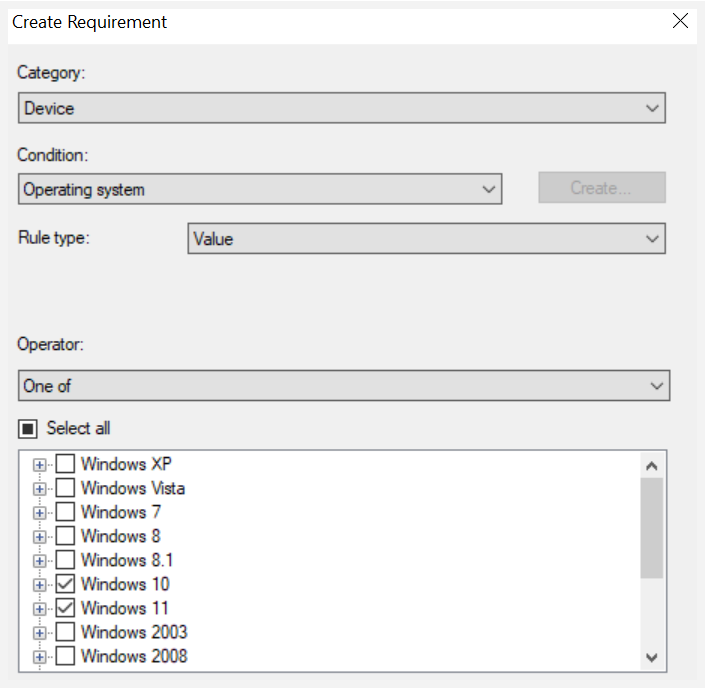
- Create a requirement rule with the following settings, and click OK:
- Category = Device
- Condition = Operating system
- Rule type = Value
- Operator = Windows 10 (64-bit) or Windows 11
- Click OK.
- Click OK. The Articulate 360 app has been created.
Repeat the process above for the following MSI installers:
- Articulate.Peek.Package.msi
- Articulate.Replay.Package.msi
- Articulate.Storyline_x64.Package.msi
- Articulate.Studio.Package.msi
Creating App Requirements for Articulate 360
Overview
This chapter describes how to establish a requirement between Articulate 360 applications and the Articulate 360 core component.
All Articulate applications require Articulate 360 to be installed. Therefore, we need to add Articulate as a requirement for the following applications:
- Articulate Peek
- Articulate Replay 360
- Articulate Storyline 360 x64
- Articulate Studio 360
Prerequisites
For the operator to perform the steps described below, the following requirements must be in place:
- The operator must have access to a system running the Configuration Manager administration console.
- The operator must be logged in with a user account with permissions to create and deploy applications.
Process Steps
- In the Configuration Manager console, navigate to Software Library / Overview / Application Management / Applications.
- In the Configuration Manager console, select the Articulate Peek application.
- Select the Deployment Types tab.
- Right-click the deployment type Peek - Windows Installer (*.msi file) and select Properties.
- Select the Dependencies tab, and click Add…
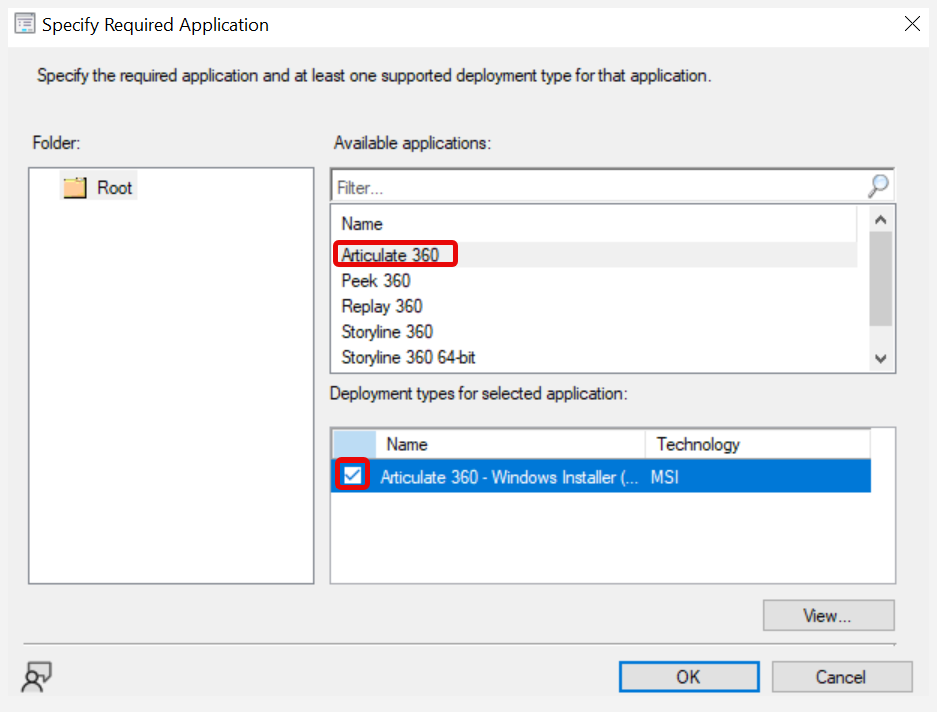
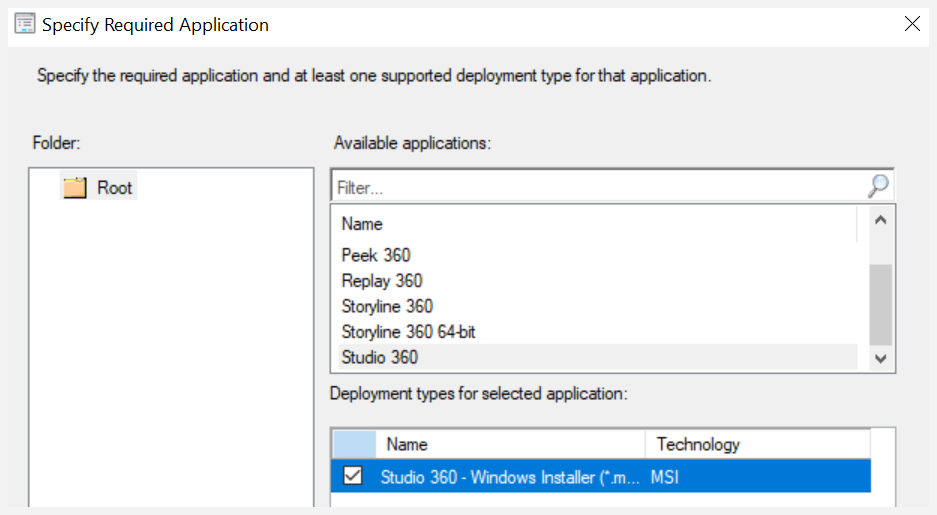
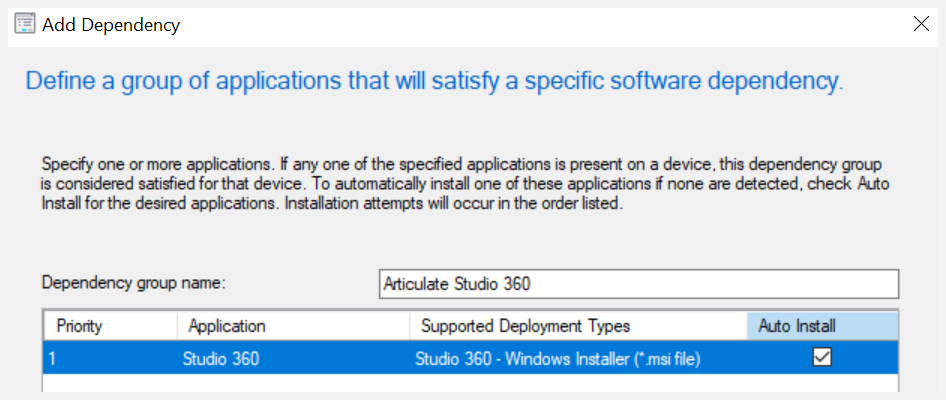
- Set the Dependency group name to Articulate 360, and click Add…
- Select the Articulate 360 application and the MSI deployment type, and click OK.

- Click OK to close the Add Dependency window.
- Click OK.
Repeat the process above for the following apps:
- Articulate Replay 360
- Articulate Storyline 360 x64
- Articulate Studio 360
Creating Thumbnail Handler Apps
Overview
Articulate Replay, Articulate Storyline, and Articulate Studio also require a thumbnail handler to be installed. Since we ended support for 32-bit operating systems on March 18, 2025 we have removed the instructions for creating an x86 deployment of the thumbnail handlers.
Prerequisites
In order for the operator to perform the steps described below, the following requirements must be in place:
- The operator must have access to a system running the Configuration Manager administration console.
- The operator must be logged in with a user account with permissions to create and deploy applications.
Process Steps
- In the Configuration Manager console, navigate to Software Library / Overview / Application Management / Applications.
- Create the following apps (use the previous chapter as a guide). Use the x64 for all apps when selecting the MSI file:
- Articulate Replay 360 ThumbnailHandler
- Articulate Storyline 360 x64 ThumbnailHandler
- Articulate Studio 360 ThumbnailHandler
- The default app name will be ShellExtensionx64, as shown below.

- Rename the app to Articulate Studio 360 ThumbnailHandler and click Next.
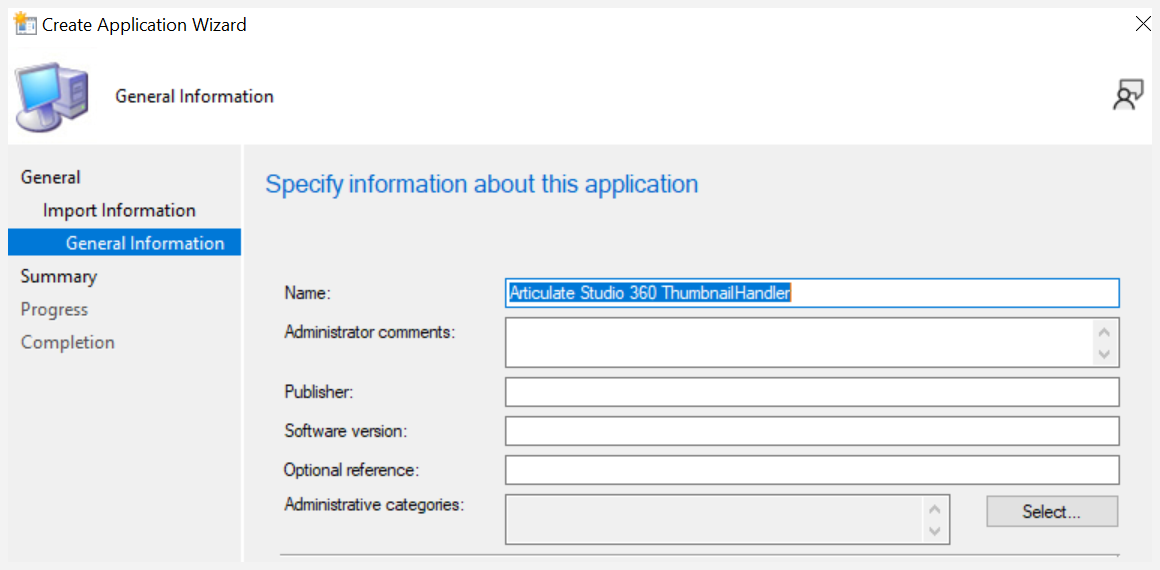
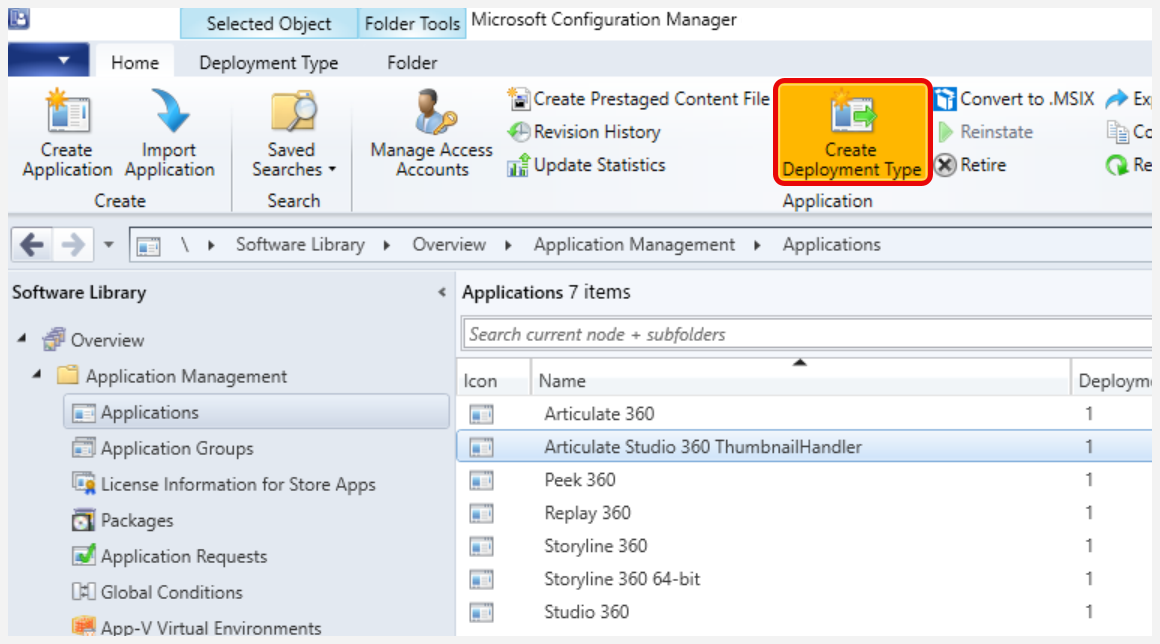
- Click Close. You should now see the ThumbnailHandler:
Repeat the process above for the following apps:
- Articulate Replay 360 ThumbnailHandler
- Articulate Storyline 360 x64 ThumbnailHandler
Preparing Articulate 360 Apps for Deployment
Overview
This chapter describes how to prepare Articulate 360 for deployment using Microsoft Endpoint Configuration Manager.
Prerequisites
For the operator to perform the steps described below, the following requirements must be in place:
- The operator must have access to a system running the Configuration Manager administration console.
- The operator must be logged in with a user account with permissions to create and deploy applications.
Process Steps
- In the Configuration Manager console, navigate to Software Library / Overview / Application Management / Applications.
- Right-click Articulate Peek and select Properties.
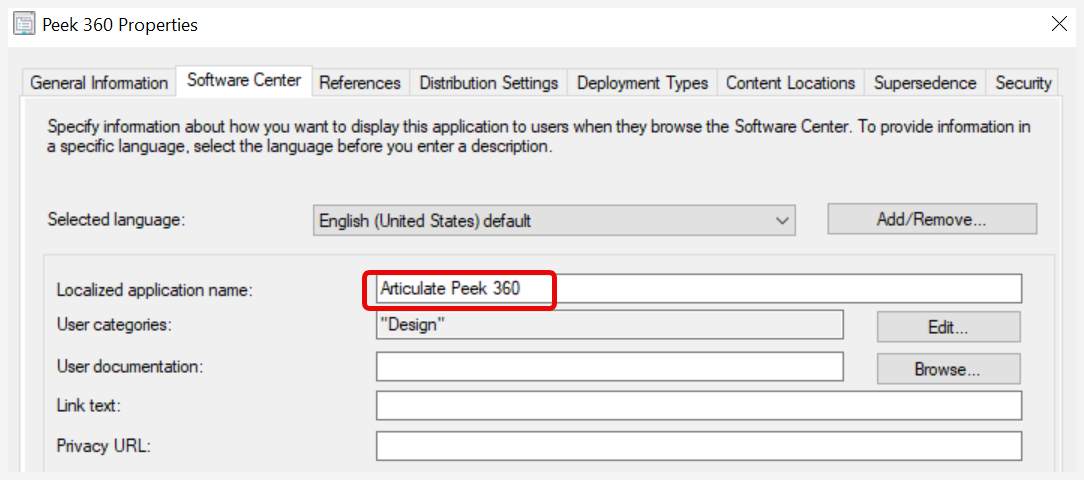
- Select the Software Center tab and set the Localized application name to Articulate Peek.
Note: This is the application name that the end user will see in the Software Center, so when configuring it for the ThumbnailHandler application, you might want to change the display name to match the value in the following table.
App Name | Localized App Name |
Articulate Peek | Articulate Peek |
Articulate Replay 360 ThumbnailHandler | Articulate Replay 360 |
Articulate Storyline 360 x64 ThumbnailHandler | Articulate Storyline 360 x64 |
Articulate Studio 360 ThumbnailHandler | Articulate Studio 360 |
- Optional: If required, you can add user categories, keywords, and icons to improve the end-user experience in the Software Center.
- Click OK.
Repeat this process above for the following apps:
- Articulate Replay 360 ThumbnailHandler
- Articulate Storyline 360 ThumbnailHandler
- Articulate Studio 360 ThumbnailHandler
Deploying Articulate 360 Apps
Overview
This chapter describes how to deploy Articulate 360 using Microsoft Endpoint Configuration Manager.
Prerequisites
For the operator to perform the steps described below, the following requirements must be in place:
- The operator must have access to a system running the Configuration Manager administration console.
- The operator must be logged in with a user account with permissions to create and deploy applications.
Process Steps
- In the Configuration Manager console, navigate to Software Library / Overview / Application Management / Applications.
- Right-click Articulate Peek 360 and select Deploy.
- On the General tab, click Browse…, then select the Collection you want to use as the deployment target.
- On the Content tab, add the required Distribution Points or Distribution Point Groups, and click Next.
- On the Deployment Settings tab, specify if the application should be Available or Required, and click Next.
- Complete the wizard (Next, Next, Next, Next, Close).
End User Experience
Overview
This chapter describes the end-user experience when deploying Articulate 360 using the Microsoft Endpoint Configuration Manager Software Center.
Prerequisites
For the operator to perform the steps in the next section, these requirements must be in place:
- The operator must have access to a Windows client system with the Microsoft Endpoint Configuration Manager client agent installed.
- The Windows client must be a member of the same Active Directory forest as the Configuration Manager site server.
- The operator must be logged in with a domain user account that is a member of the All Users collection in Microsoft Endpoint Configuration Manager.
- The Software Center should be installed and configured in the Microsoft Endpoint Configuration Manager.
Process Steps
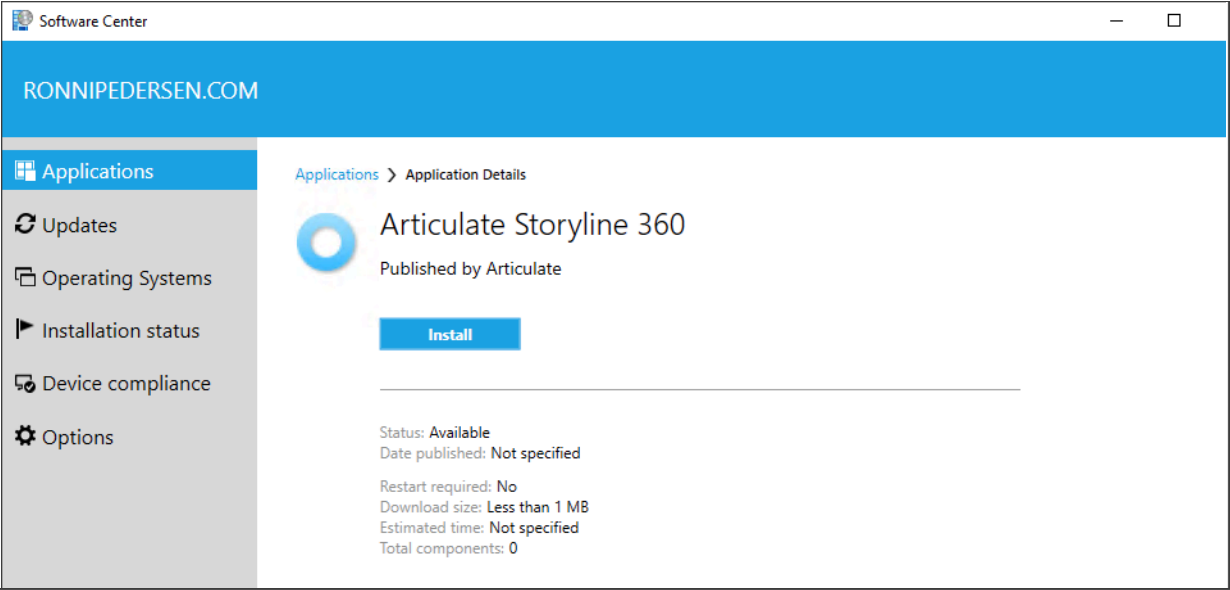
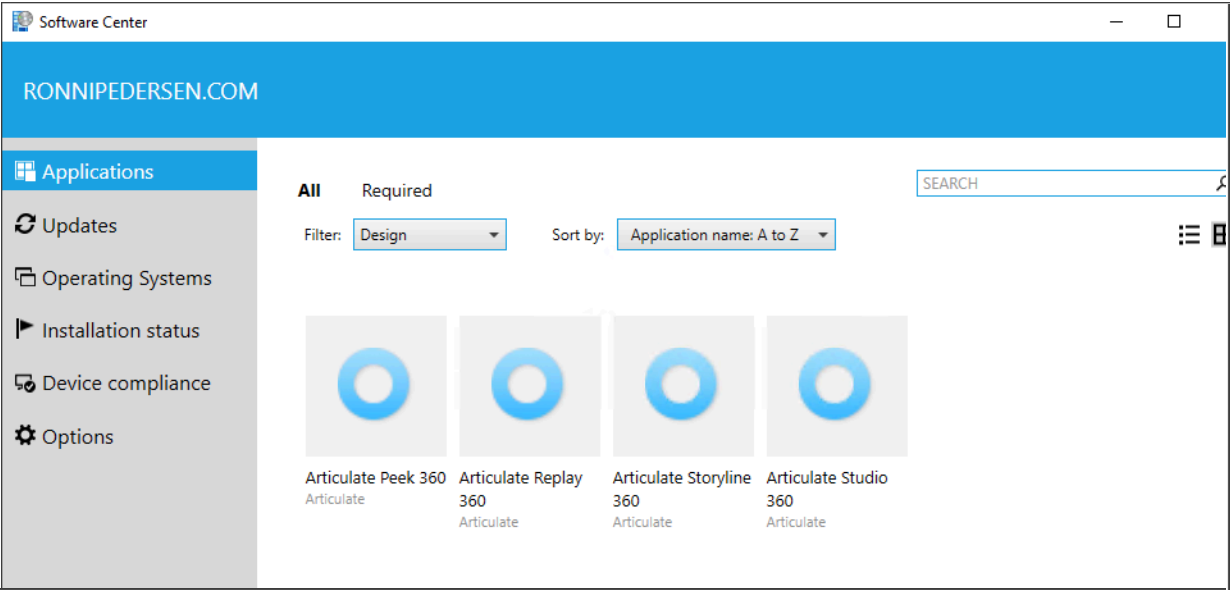
- Log in to the Windows client and start Software Center.
- Click the app you want to install.
- Click Install.
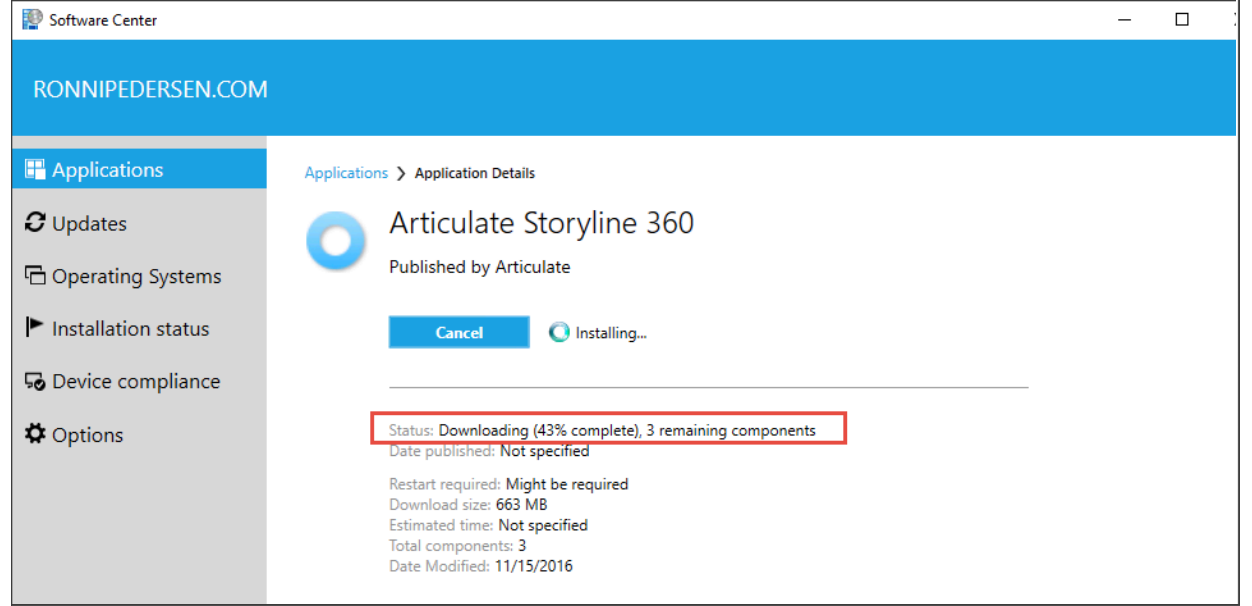
- Depending on the network speed and hardware configuration, the installation might take several minutes.
Note: The image below shows that three components are downloaded. This is because the app depends on two other apps that must be installed first.
- When the installation is complete, the status should change to Installed, as shown below.
That's it. Happy deployment!
Troubleshooting
Overview
This chapter contains tips for troubleshooting Articulate 360 deployments.
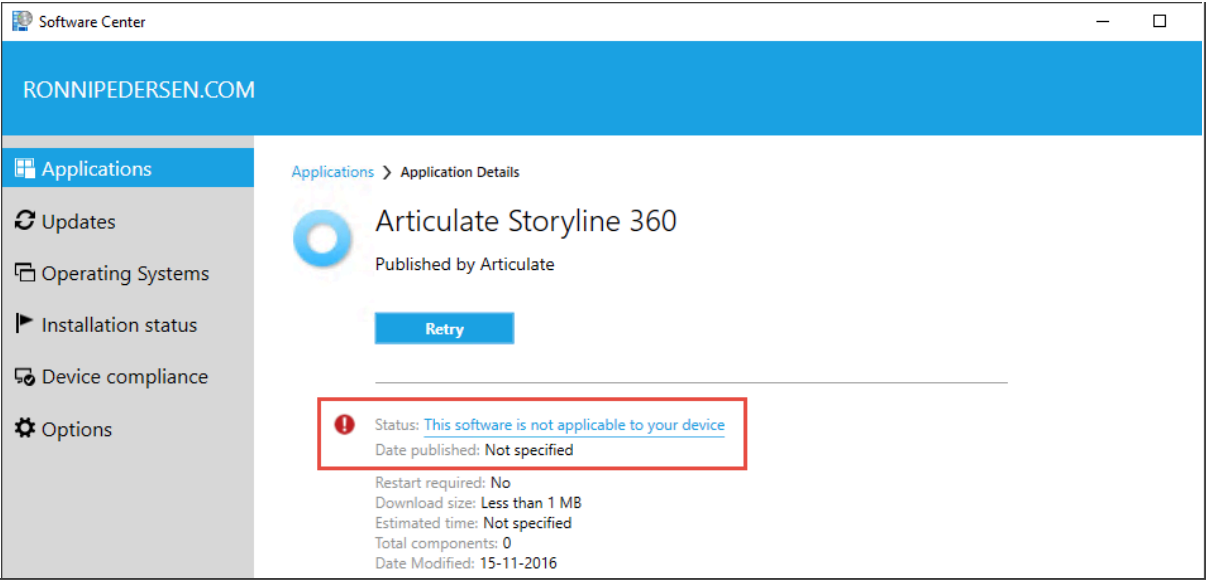
Software Center
Error message: This software is not applicable to your device
All deployment types may have requirements for disk space, memory, operating system, etc. If the client doesn't meet the requirements, this error will be displayed to the end user.